
Photoshop使用涂抹和减淡工具制作毛发艺术字

本教程主要使用Photoshop使用涂抹和减淡工具制作毛发艺术字,毛发的制作方法有很多,用钢笔描边路径制作是最繁琐的,同时是最精细的。下面介绍较为简单的方法,直接用定义好的笔刷来制作,只需要慢慢涂抹就可以做出想要的毛发效果。
先看看效果图

1、制作文字之前需要先定义两款笔刷,新建一个20 * 20像素,分辨率为72像素的文件,背景填充黑色,新建一个图层,把前景颜色设置为黑色,用圆形画笔在画布中点一个大小不同的小点,如图1,执行:编辑 > 定义画笔。也可以点这里直接下载笔刷。

2、新建一个1000 * 600像素,分辨率为72像素的文件,选择渐变工具,颜色设置如图2,由上至下拉出图3所示的线性渐变作为背景。


3、打开文字素材,拖进来或输入自己想要的文字,选择好字体,文字颜色用黄褐色:#A27C3B。

4、用套索把第一个字母选区出来,按Ctrl + J 复制到新的图层,下面的文字图层影藏,效果如下图。

5、选择涂抹工具,在笔刷中选择刚才定义的画笔,属性设置如图7,不透明度设置为50%。


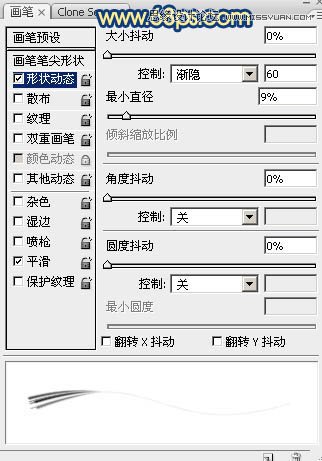
6、按F5调出画笔设置面板,设置画笔笔尖形状及形状动态,参数设置如下图。


7、把文字局部放大,先用涂抹工具涂抹文字底部,慢慢涂抹,效果如图11。


8、双击文字缩略图调出图层样式,设置斜面和浮雕,参数及效果如下图。这一步给文字加上阴影和高光。高光颜色为:#FCE9CA,阴影颜色为黑色。


9、在工具栏选择减淡工具,选择刚才定义的画笔,属性栏栏设置如图15,曝光度设置为20%。


10、按F5键调出画笔设置面板,设置笔刷的一些参数如图16,17。

11、用减淡工具按住毛发的走向涂抹,先涂出较淡的总体效果,如图18,19。


12、把减淡工具的曝光度设置为30%,加强毛发中间的高光区域,可以随时调整笔刷的大小。


13、创建亮度/对比度调整图层,适当增加亮度及对比度,参数设置如图22,确定后按Ctrl + Alt + G 创建剪贴蒙版,效果如图23。


14、创建可选颜色调整图层,对白色进行调整,参数设置如图24,确定后同样按Ctrl + Alt + G 创建剪贴蒙版,效果如图25。


15、创建色彩平衡调整图层,对高光进行调整,参数设置如图26,确定后创建剪贴蒙版,效果如图27。


16、其它文字的制作方法完全相同,效果如下图。

最后修饰一下细节,给文字增加一点投影,完成最终效果。
来源:PS联盟 Sener